Tuesday Tutorial ... Multi Page Enlarged Graphics at Home
 For today's Tutorial, you need to find one ugly round table. This one came from my local thrift store and cost, unbelievably, $4.
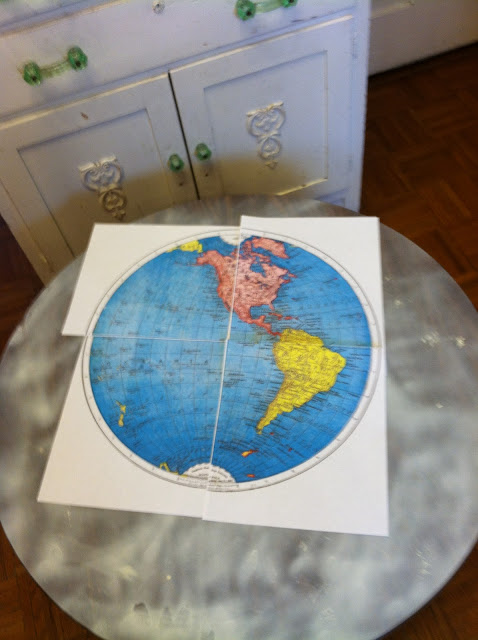
 After painting the table a nice French blue, which for some strange reason looks like a weird green in my pictures, I was ready for my 'world'. I really wanted a full round globe, but after checking my atlases, and on line, a round single hemisphere was the best I could do. I am grateful to Graphics Fairy that she has this one with some vintage flair. Above you can see how I made multiple 'copies' on my photo site and then cropped them into 4 quarters. It was easy with the map, because it had the grids of the longitude and latitude, but I have done other pics, by choosing a detail in the center and cropping it so that point is in one corner of all four quarters, them trimming them to fit. Here you see that I positioned them, using a ruler to make sure together they were all centered, before applying the Modpodge to the back and placing them. Once in place, more Modpodge was painted on to seal it in place.
 With several coats of spray on clear varnish, it was ready to go. Here it is shown in my family room, where the 'world' is protected from the likes of coasterless cold drinks!!
 I really thought it turned out to be bright and whimsical. I hope you learned something new with this tutorial, or maybe it sparked an idea for a project of your own. Thanks for dropping by and be sure to come back tomorrow to see pics of how our flea.o.logy flea market went. We had 34 dealers, thousands of customers and zillions of cool stuff.

 For today's Tutorial, you need to find one ugly round table. This one came from my local thrift store and cost, unbelievably, $4.
 After painting the table a nice French blue, which for some strange reason looks like a weird green in my pictures, I was ready for my 'world'. I really wanted a full round globe, but after checking my atlases, and on line, a round single hemisphere was the best I could do. I am grateful to Graphics Fairy that she has this one with some vintage flair. Above you can see how I made multiple 'copies' on my photo site and then cropped them into 4 quarters. It was easy with the map, because it had the grids of the longitude and latitude, but I have done other pics, by choosing a detail in the center and cropping it so that point is in one corner of all four quarters, them trimming them to fit. Here you see that I positioned them, using a ruler to make sure together they were all centered, before applying the Modpodge to the back and placing them. Once in place, more Modpodge was painted on to seal it in place.
 With several coats of spray on clear varnish, it was ready to go. Here it is shown in my family room, where the 'world' is protected from the likes of coasterless cold drinks!!
 I really thought it turned out to be bright and whimsical. I hope you learned something new with this tutorial, or maybe it sparked an idea for a project of your own. Thanks for dropping by and be sure to come back tomorrow to see pics of how our flea.o.logy flea market went. We had 34 dealers, thousands of customers and zillions of cool stuff.
Your tutorial is perfect! I love the world table. :)
ReplyDeleteOh my gosh! I don't know where I've been, but I have never seen your blog before! I love it! I love this project and so many of your others. I saw you over at Savvy Southern Style and am so happy to be following you via GFC! Thanks for sharing this!
ReplyDeleteThanks for your kind enthusiasm Danni, and welcome to my blog. I have a ton of fun sharing projects and outings. Knowing I need to post something new everyday even gets me going sometimes. Welcome!
DeleteThe table is darling, but I'm REALLY in love with the chipped door behind it.
ReplyDeleteOh yes, me too. I actually found the door at an antique store and had to pay (argg) full price, but I adore it. My husband even cut the hole in the wall to install it. (I really did need the new exit, honest I did. :-))
DeleteIsn't it amazing what a great coat of paint can do with a piece? I think your "world" table is so fun and chic! Thanks for your easy to understand tutorial!!!!
ReplyDeleteWhat a great blog you have!
Love your world!
ReplyDeleteIt turned out great, love the idea and the finished project!! Thanks for sharing and I am a new follower!
ReplyDeleteHope you have a great weekend!
Michelle
www.delicateconstruction.com
This looks amazing! Great job. We are so happy that you linked up to our "Strut Your Stuff Saturday" and we hope you see you back next week!! -The Sisters
ReplyDeleteWhat a neat idea! Thanks for sharing at Shine on Fridays!
ReplyDelete