
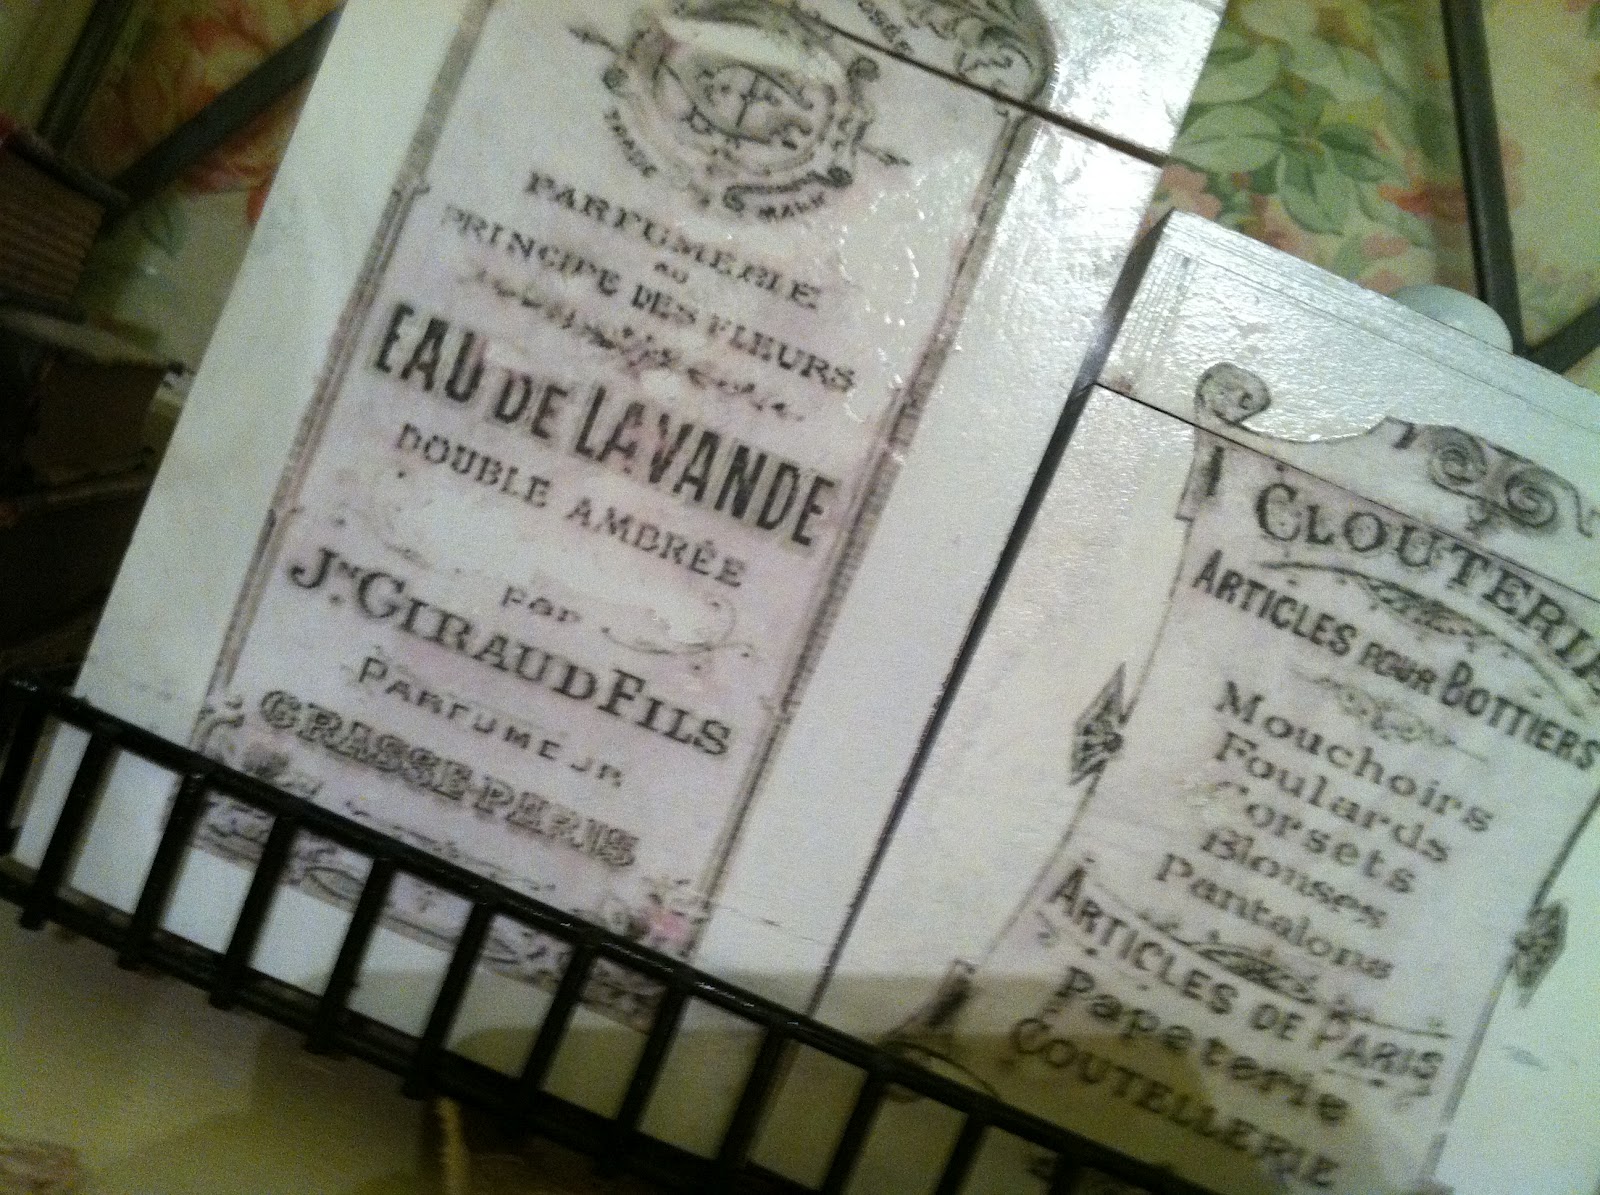
 Yep, its Makeover Monday once more. This week I decided to share a set of canisters that I bought because I loved the metal stand they came in. The canisters were stained a redwood color and had a rusty rustic heart glued on the front of each. It took some serious sanding to get rid of the glue residue.
 Then several coats of white enamel spray paint and they are ready for their new look. I found these graphics on Graphics Fairy, where else? I printed them off after reversing them. Then it was time to trim them closely to get them ready to be applied.
 I brushed them with Modpodge on the face, then applied them face down to the canisters. Pressing them firmly into place. Don't you love the residue of both black and white spray paint on my fingernails and fingers? Well, that's what I do!!
 After applying the labels I allow them to dry for at least an hour. I have noticed that if the paper layer closest to the item is still wet it is more apt to come off with the top layer I am trying to take off.
 When the paper is dry through, I dampen a small area with a cloth or sponge, maybe an inch square and work quickly, if I wet too much, it soaks through to the bottom, and I have the same problem as when I don't allow it to dry, the bottom layer, with the design, comes off too. Now with the one square inch dampened I start to rub away the top layers of paper, as seen above, revealing the graphic underneath. When I have removed all I want to remove, and not too much, I allow it to dry.
After it is dry I lightly sand it with fine sand paper to make it smooth. Then I spray on a clear coat on top to make it water proof, a few light coats is best.
As you can see sometimes I loose a bit of the design here or there. I think this adds to the aged look of the pieces, as long as it is not too much, or takes off an important word or design element. When this happens, I print off another design, and cut out the missing part I want and repeat the process, just with that bit.

 Here are the finished canisters. Because the labels refer to varied industries, such as perfume, underwear and food, I think they could be used anywhere you have need for some attractive storage.
Here they are shown in a bedroom, on a dresser, where they could hold assorted jewelry, makeup or lotions. In a craft room they could be used for scissors, glue, tape, pens, markers, well the list is endless.

Thanks for coming along for this tutorial. I hope you enjoyed it. I know this method is imperfect, but I cannot tell you the thrill it is when you first start to rub away the paper and the design you have chosen magically starts to appear. I guess I am just hooked, but if you have been reading my blog for long, you figured that out a long time ago, I am sure.
Hi. I found you on the Graphics Fairy website (absolutely love her!). Thanks for the instructions on how to transfer the labels. This is terrific!
ReplyDeleteAngie
Thanks for the tutorial, really want to try this technique. You canisters look fantastic.
ReplyDeleteYour canisters look lovely!! Thanks for the quick tutorial.!
ReplyDeleteThanks for this tutorial, it's the first time I see this transfering option with glue, will try it for sure!
ReplyDeleteYour canisters turned out great, but I couldn't get past the lovely green clocks! And your leaded glass window backed with fabric (or wallpaper?). The whole vignette is very sweet.
ReplyDeleteThanks Vickie, the window is backed with 50's drapery fab. Thought about a mirror, as the window hides an irregular corner, but didn't need another mirror in that room, and wanted a touch of pattern. The old fabric was obviously less pricey than a 2 foot by 4 foot mirror. :-) Happy all around, and I DO love the leaded diamond pane window ... seems so English Cottage.
DeleteHi, I love how your canisters turned out. I just did my first transfer on a smaller level but I think I am hooked also. I don't yet no how to reverse an image. Great job... Connie
ReplyDeleteThose canisters are marvelous. And, I love the vignette with them front and center. Nice work.
ReplyDeleteThey turned out great! I really have to give your reverse transfer method a try one of the days. Thanks for sharing at Etcetorize this week~
ReplyDeleteAnother great project. These would look gorgeous in my french country kitchen with my roosters. : ) Thanks again for the tutorial.
ReplyDeleteBarbe
Another great project Pollyanna. Thanks for sharing it at Shabbilicious Friday.
ReplyDeleteI'm sorry, but I don't get it...did you print these on transfer paper? *LOL* perhaps a senior blonde moment!? *lol* Please clarify...I just purchased transfer paper to use on fabrics...thanks!
ReplyDeleteNope, just regular printer paper. You paste a reversed copy of your graphic which has been closely trimmed, face down on a painted wood surface with modpodge. Allow it to dry and then rub away the paper pulp until the amount of the design shows that you want.
Delete